Programming with geoh5 (ANALYST API)#
This section provides examples on how to interact with Geoscience ANALYST programmatically by using the geoh5 API geoh5py. We are going to demonstrate how to
Create/open a geoh5 workspace
Access objects and data
Use third-party packages to create and plot data
Let’s get started with some imports.
from __future__ import annotations

import matplotlib.pyplot as plt
import numpy as np
from geoh5py.objects import Points
from geoh5py.workspace import Workspace

from training import assets_path
Creating or Opening a Workspace#
In geoh5, the Workspace class acts as the central container for all your data. It handles:
Reading from and writing to the
.geoh5file on diskRegistering and instantiating entities such as groups, objects, and data arrays
There are two ways to create or connect to an existing geoh5 file through its Workspace.
Option 1: Context manager#
The preferred way to open a Workspace is with a context manager. This ensures the file is properly closed when you’re done with it, even if an error occurs:
with Workspace(assets_path() / "suncity.geoh5") as workspace:
    # Do things with the open Workspace here
    print(workspace.geoh5)
<HDF5 file "suncity.geoh5" (mode r+)>
What happens:#
Workspace(assets_path() / "suncity.geoh5")opens the file (or creates it if it doesn’t exist).The
withstatement yields the workspace objectworkspace.When the
withindented code block ends,workspace.close()is called automatically. This ensures all changes are written to the file and allows other programs to open it.
Option 2: Explicit open() and close()#
The second option is to directly instantiate the Workspace or to call the open() method.
# This line is not necessary if you've already instantiated a Workspace previously, either explicitly or with a context manager
workspace = Workspace(assets_path() / "suncity.geoh5")

# open or create the file
workspace.open()
print(workspace.geoh5)
<HDF5 file "suncity.geoh5" (mode r+)>
/home/docs/checkouts/readthedocs.org/user_builds/mirageoscience-python-training/conda/release-0.1.0/lib/python3.10/site-packages/geoh5py/workspace/workspace.py:1252: UserWarning: Workspace already opened in mode r+.
  warnings.warn(f"Workspace already opened in mode {self._geoh5.mode}.")
What happens:#
workspace.open()opens (or creates) the file and returnsworkspace.You can perform all desired actions on the workspace.
To close the workspace, simply do
workspace.close()in a later line.
We are going to leave the workspace open for now. Don’t forget to close it at the end!
An already-open workspace will usually tell you if you try to access it from elsewhere (e.g., when trying to open the same workspace in multiple notebooks at once). You will also find that a workspace currently opened in Geoscience ANALYST will not be openable from Python.
Objects and data#
When connecting to an existing geoh5 file, the API will travel through the
Workspace and collect minimal information about the groups, objects and
data present on file. At the base of this parent/child hierarchy is the root group.
Every entity has a parent, except for the root. Note that no values are loaded unless directly requested.
workspace.root.children
[<geoh5py.objects.points.Points at 0x760c0117fa90>,
 <geoh5py.objects.grid2d.Grid2D at 0x760c010316f0>,
 <geoh5py.objects.points.Points at 0x760c01031ba0>,
 <geoh5py.objects.surface.Surface at 0x760c01032980>]
The Workspace itself has a few utility methods to quickly access all groups, objects or data registered.
workspace.groups, workspace.objects, workspace.data
([<geoh5py.groups.root.RootGroup at 0x760c1c0f2470>],
 [<geoh5py.objects.points.Points at 0x760c0117fa90>,
  <geoh5py.objects.grid2d.Grid2D at 0x760c010316f0>,
  <geoh5py.objects.points.Points at 0x760c01031ba0>,
  <geoh5py.objects.surface.Surface at 0x760c01032980>],
 [<geoh5py.data.visual_parameters.VisualParameters at 0x760c0117f700>,
  <geoh5py.data.float_data.FloatData at 0x760c010317e0>,
  <geoh5py.data.float_data.FloatData at 0x760c01031c30>,
  <geoh5py.data.float_data.FloatData at 0x760c01031d20>,
  <geoh5py.data.float_data.FloatData at 0x760c01031de0>,
  <geoh5py.data.float_data.FloatData at 0x760c01031ea0>,
  <geoh5py.data.float_data.FloatData at 0x760c01031f60>,
  <geoh5py.data.float_data.FloatData at 0x760c01032020>,
  <geoh5py.data.float_data.FloatData at 0x760c010320e0>,
  <geoh5py.data.float_data.FloatData at 0x760c010321a0>,
  <geoh5py.data.float_data.FloatData at 0x760c01032260>,
  <geoh5py.data.float_data.FloatData at 0x760c01032320>,
  <geoh5py.data.float_data.FloatData at 0x760c010323e0>,
  <geoh5py.data.float_data.FloatData at 0x760c01032590>,
  <geoh5py.data.float_data.FloatData at 0x760c01032470>,
  <geoh5py.data.visual_parameters.VisualParameters at 0x760c01032620>,
  <geoh5py.data.float_data.FloatData at 0x760c01032710>,
  <geoh5py.data.float_data.FloatData at 0x760c01032830>,
  <geoh5py.data.float_data.FloatData at 0x760c010328f0>,
  <geoh5py.data.float_data.FloatData at 0x760c01031ab0>,
  <geoh5py.data.float_data.FloatData at 0x760c01032800>,
  <geoh5py.data.float_data.FloatData at 0x760c01031990>,
  <geoh5py.data.float_data.FloatData at 0x760c01032c50>,
  <geoh5py.data.visual_parameters.VisualParameters at 0x760c010329b0>])
The get_entity method allows to retrieve entities by name or uid.
grid = workspace.get_entity("SunCity")[0] # Set 'grid' to be the first element of the list returned by get_entity
The get_entity always returns a list, as many entities could have the same name.
f"I have recovered a {type(grid)} with uuid: {grid.uid}"
"I have recovered a <class 'geoh5py.objects.grid2d.Grid2D'> with uuid: 80055798-658f-4dae-9023-56e8f85fc8af"
It is best-practice to instead use get_entity with a unique identifier (uuid)
to guarantee access to a specific entity.
workspace.get_entity(grid.uid)[0] == grid
True
Likewise, data associated with an object can be accessed through the children attribute.
To access data with values, the workspace must be re-opened if closed.
grid.children
[<geoh5py.data.float_data.FloatData at 0x760c010317e0>,
 <geoh5py.data.float_data.FloatData at 0x760c01031c30>,
 <geoh5py.data.float_data.FloatData at 0x760c01031d20>,
 <geoh5py.data.float_data.FloatData at 0x760c01031de0>,
 <geoh5py.data.float_data.FloatData at 0x760c01031ea0>,
 <geoh5py.data.float_data.FloatData at 0x760c01031f60>,
 <geoh5py.data.float_data.FloatData at 0x760c01032020>,
 <geoh5py.data.float_data.FloatData at 0x760c010320e0>,
 <geoh5py.data.float_data.FloatData at 0x760c010321a0>,
 <geoh5py.data.float_data.FloatData at 0x760c01032260>,
 <geoh5py.data.float_data.FloatData at 0x760c01032320>,
 <geoh5py.data.float_data.FloatData at 0x760c010323e0>,
 <geoh5py.data.float_data.FloatData at 0x760c01032590>,
 <geoh5py.data.float_data.FloatData at 0x760c01032470>,
 <geoh5py.data.visual_parameters.VisualParameters at 0x760c01032620>,
 <geoh5py.data.float_data.FloatData at 0x760c01032710>,
 <geoh5py.data.float_data.FloatData at 0x760c01032830>,
 <geoh5py.data.float_data.FloatData at 0x760c010328f0>]
or with the utility method get_data to access it by name
dem = grid.get_data("Band 1")[0]
dem
<geoh5py.data.float_data.FloatData at 0x760c01032590>
Data values are accessed through the values attribute of the data entity.
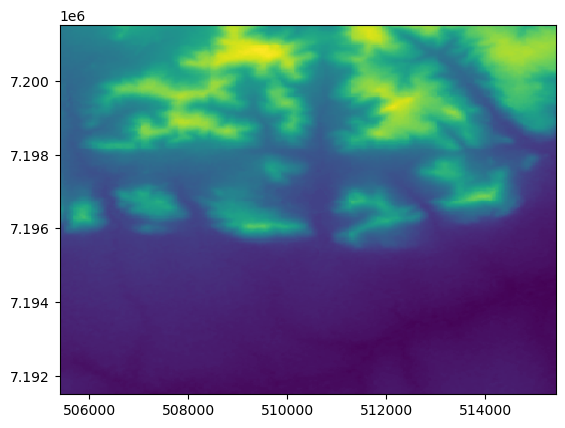
Let’s use a third party plotting package matplotlib to display the information on file.
plt.pcolormesh(
    grid.origin["x"] + grid.cell_center_u, # 1D array of absolute x-coordinates for cell centres
    grid.origin["y"] + grid.cell_center_v, # 1D array of absolute y-coordinates for cell centres
    dem.values.reshape(grid.shape), # 2D array of DEM elevations arranged in (ny, nx) order
)
<matplotlib.collections.QuadMesh at 0x760c0109d5a0>
Creating objects#
The geoh5 format supports a wide range of object types as documented here. Let’s practice creating a simple Points object using the .create() method.
For our Points object to be fully defined, we need to assign vertices as an array of 3D coordinates shape(*, 3), i.e., a row for each vertex, and 3 columns holding the XYZ coordinates of each vertex.
Let’s add one point at the Sun City resort.
point = Points.create(workspace, vertices=np.c_[510000, 7196500, 1150], name="Points")
Here, we created a new Points object in the geoh5 workspace, where:
workspaceis our Workspace instance to store the dataverticesis a 2D NumPy array of XYZ coordinates for each point (in our case, the object has only one point)np.c_[510000, 7196500, 1150]uses NumPy’s “column stack” helper to build an array of shape (1, 3) from the provided values, representing a single point at X=510000, Y=7196500, Z=1150
name="Points"is a human-readable label for this Points entity in the file
For more examples on how to create other object types, visit the geoh5py User Guide.
Adding Dipole Data to a Points Object#
To demonstrate how to add data to an object, we’ll attach three pieces of data to our Points object—moment magnitude, inclination, and declination—and then group them so they can be visualized as arrows in ANALYST:
# Add dipole properties (moment strength, inclination, declination)
params = point.add_data(
    {
        "moment": {"values": np.r_[1.0]},
        "inclination": {"values": np.r_[-62.11]},
        "declination": {"values": np.r_[-17.9]},
    }
)

# Create or get a property group named "dipole" for organizing these values
prop_group = point.find_or_create_property_group(
    name="dipole",
    property_group_type="Dip direction & dip",
    properties=params[1:] # Assign the new data objects (params[1:]) to the "dipole" group
)
First, we use
point.add_data()to create new Data objects.Then use
find_or_create_property_group()to add data to the “dipole” property group.
Finally, make sure the workspace is closed to finalize all changes.
workspace.close()
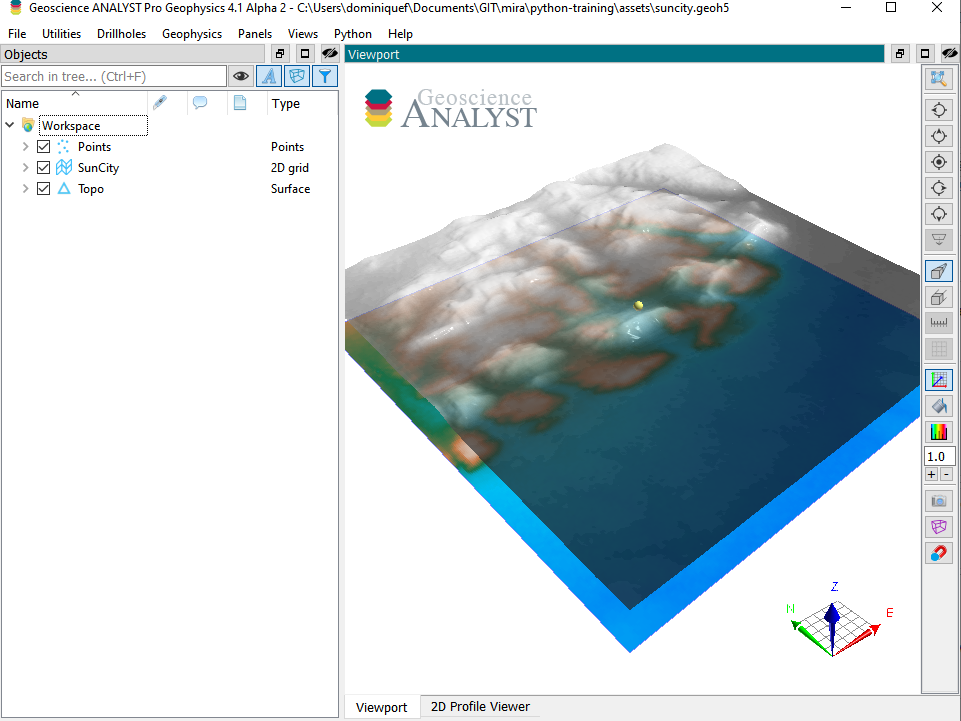
Since we have closed workspace, you can now safely open the suncity.geoh5 with ANALYST to see the result.
Copyright (c) 2022 Mira Geoscience Ltd.